Dentist
Achieving Natural Tissue Contours: A Predictable and Simplified Technique
May
Dr. Dino Javaheri
INTRODUCTION
Although the functional success rate of dental implants is very high, aesthetic failures still occur in the maxillary anterior region. In addition to the standard aesthetic issues with tooth-supported crowns, implants have multiple additional factors that cannot be ignored, like tissue contours, tissue height, and the abutment emergence profile. These extra issues can make the fabrication of an aesthetic anterior implant restoration challenging.1,2 The first restorative steps in addressing anterior aesthetic implant issues are forming the tissue and then taking an accurate impression. One challenge has been that forming the tissue is very time consuming when done chairside, but involves additional costs if fabricated by a dental laboratory technician.3 Another concern is obtaining an accurate tissue impression due to the tissue rapidly collapsing once the provisional restoration is removed.4 This article presents a simplified chairside technique for both temporary fabrication and impression taking.
Achieving a Natural Appearance
One of the main challenges that needs to be overcome to make anterior implants look natural is achieving natural tissue contours. This problem occurs once a patient is discharged by the surgeon, since there is a circular healing cap on top of the implant that is much smaller and incorrectly shaped relative to the natural tissue contours.5 To be able to reproduce the correct contours, the tissue needs to be formed prior to creating an accurate impression.6,7 Forming the tissue ideally starts at the time of implant placement, if there is enough bone to support the implant. The best results can be achieved by performing an atraumatic flapless extraction with implant placement.8 Then, one attempts to maintain tissue contours with a temporary crown that matches the emergence profile, contours, and size of a natural tooth. Although this technique is very useful, most often it cannot be utilized because adequate initial insertion torque cannot be achieved. In such situations, a standard healing cap is then placed either at initial placement or during an uncover appointment. After healing, forming the tissue to the natural contours becomes the restorative dentist’s responsibility. The restorative dentist must form the tissue to make it appear as if the restoration is emerging through the tissue just like a natural tooth.9 If the tissue is not made to replicate the natural form of a tooth, then the aesthetics will be compromised and the abutment contours and margin positions may be incorrect. To form the tissue, a temporary restoration can be made and then altered with composite or acrylic to change its contours.9,10
Another more recent option is to use a tissue former. Tissue formers are temporary, anatomically correct temporary abutments. If an implant cannot be loaded due to insertion torque, the supragingival cylinder can be removed and the temporary abutment becomes an anatomically correct healing abutment. These tissue formers are made in a variety of shapes and allow the surgeon to place an appropriately sized healing abutment, thereby saving the patient and dentist time, and reducing costs.
The Challenge of an Accurate Impression
Once the tissue has been adapted to the proper contours, the next challenge becomes taking an accurate impression. The difficulty here is that, as soon as the temporary is removed, the tissue immediately starts to collapse. Consequently, a standard implant-level impression will not give an accurate tissue-level impression. There are multiple techniques available to obtain an accurate tissue-level impression. The technique most commonly used is to make a replica of the desired tissue contours by adding composite or acrylic around a standard impression post. However, this technique is both time consuming and only a close approximation, as the tissue position starts to change as soon as the provisional restoration is removed.11,12 A simpler, faster, and more accurate technique is to take an impression of the tissue contours from the temporary crown, as this will provide an exact replica of the tissue positions. This second technique is presented in this article.
A final consideration for implant impressions is whether to take closed- or open-tray impressions.12 For a closed-tray impression, the impression post is tapered and stays connected to the implant once the impression is removed. This technique is easier; however, it is more likely to have distortion in the vertical fit of the restoration. When the impression post is reinserted back into the impression, there can be minor discrepancies depending on the amount of pressure used at reinsertion. For the open-tray impression technique, the impression post stays secured inside the impression material. Since there is no need for reinsertion of the impression post, this technique is more accurate.12,13
This article also demonstrates a simplified technique for taking an open-tray impression.
CASE REPORT
Diagnosis and Treatment Planning
A 50-year-old male patient presented for restoration of an implant (Neoss) placed at the site of the maxillary left central incisor (Figures 1 and 2). The patient had been wearing a removable temporary partial denture during the healing phase. Although an impression could be taken at this point, the laboratory technician would then have to make a complete guess related to the final tissue position. If the technician guessed incorrectly, it would compromise the results. As the restoration is being placed, the tissue needs to expand, causing the tissue level to drop. This could expose the abutment and cause aesthetic failure. If the abutment margins are placed deep to compensate for the tissue expansion and drop, then the cleanup of cement would be difficult. Also, there may be significant subgingival porcelain that would not provide for good tissue attachment. To make sure the margins and emergence profile are correct, the tissue needs to be shaped to the final contours prior to taking a final impression.

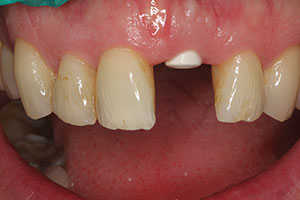
Figure 1. Facial view of the implant (Neoss) Figure 2. The implant had a small healing
ready for the restoration phase. cap that did not provide proper tissue contours.
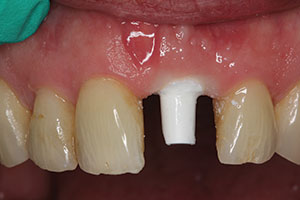
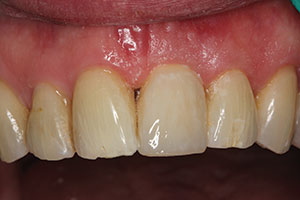
Figure 3. A PEEK abutment tissue former Figure 4. Provisional restoration (Structur
(Tissue Former [Neoss]) was used to expand the Premier [VOCO America]) showing the
soft tissue to the ideal shape for restoration. tissue being formed.
To form the tissue, a PEEK temporary abutment or cylinder may be used. PEEK is a biocompatible high-grade thermoplastic polymer (polyetheretherketone) for use in medicine and dentistry. PEEK is used as a temporary material that can be easily adjusted. If a cylinder is used, then the subgingival emergence profile needs to be constructed chairside. However, if an abutment is used, then the subgingival profile is already completed, saving a significant amount of time.
For this case, a PEEK abutment (Tissue Former [Neoss]) was used, selected to match the desired emergence profile and the chimney portion trimmed to be slightly out of occlusion. The margins of the crown were placed right at the tissue level to facilitate temporary fabrication and cleaning up of the temporary cement. The prepared PEEK abutment was finger-tightened (Figure 3). It is normal for the patient to feel some initial pressure with the seating of the PEEK abutment. This pressure should be gone in approximately 15 minutes, unless there is a need for significant expansion of the tissue. In such cases, the patient can be anesthetized and, if needed, a small cut can be made in the tissue in the lingual area to relieve the expansion stress. With the PEEK abutment in place, the abutment access hole was blocked with a cotton pellet and a screw-retained provisional crown was fabricated using a bis-acryl composite material (Structur Premier [VOCO America]) (Figure 4). If a screw-retained restoration cannot be fabricated, a standard crown can be made and cemented using provisional cement.
The patient was examined every 2 weeks to evaluate tissue health. The PEEK abutment and provisional crown were adjusted, as needed, to improve the tissue contours. Once the ideal tissue contours had been achieved, impressions were taken. First, a standard open-tray impression was taken to give the laboratory technician the position of the implant relative to the adjacent teeth and occlusion. One of the challenges in taking open-tray impressions is providing a hole in the tray for the longer impression post (Figure 5). Custom trays can be time consuming and not easily fabricated in most dental offices. A hole can be drilled into a stock tray for the impression post; however, this is messy and takes up time.
A new option is to use a breakaway impression tray (Cbite DDS Implant Tray [Cbite Dental Products]) (Figure 6). These impression trays have small panels that can be easily removed using a cotton plier to create clearance around the impression coping. Using a breakaway tray allows one to take fast and easy open-tray implant impressions.
To use a breakaway tray, first the location of the implant is determined on the tray. Then the panels are removed, making sure there is enough clearance around the impression post for easy seating (Figure 7). After the lateral clearance has been verified clinically, impression material (Take 1 Advanced [Kerr]) is inserted and the tray fully seated (Figure 8). Using minimal wash material is indicated with implant impressions as the rigid tray material will provide more stable support for the impression post during the stone pour-up in the dental lab (Figure 9). The screw access hole for the impression post must be located before the impression material sets to facilitate removal. This first impression is not accurate for tissue position since, as soon as the provisional abutment and crown are removed, the tissue loses its support and starts to collapse. The most accurate and simple way to replicate the tissue contours is to take an impression of the provisional restoration emergence profile.
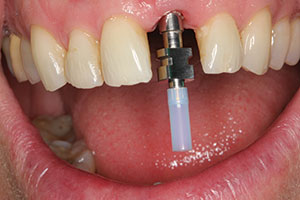
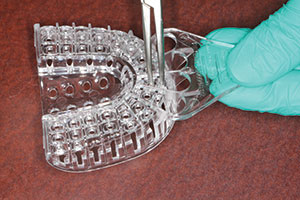
Figure 5. Figure 6. A section of the breakaway
An open-tray impression post was impression tray (Cbite DDS Implant Tray
placed. [Cbite Dental Products]) was easily removed.
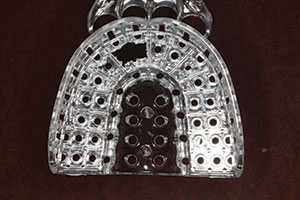
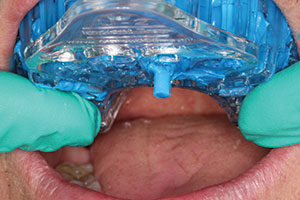
Figure 7. Holes should be big enough for the Figure 8. Screw access cylinder exposed on
impression post to have adequate clearance. the impression post.
To utilize this technique in this patient, the provisional restoration was connected to an analog implant replica (Figure 10). Then, a standard needle cap was filled with impression material and the connected analog and provisional restoration were inserted together into the impression material to the level of the tissue height of the contour (Figure 11). Once the impression material had set, the provisional was screwed out, thus leaving behind the analog with an exact replica of the formed emergence profile (Figure 12). The provisional screw-retained crown was then placed back onto the implant. The impressions, along with other records like photographs, were sent to the lab for fabrication of the final restoration.

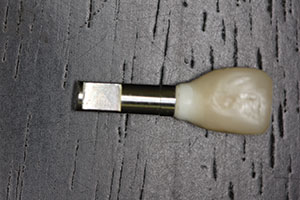
Figure 9. The impression post remained Figure 10. The provisional restoration was
inside the impression. connected to an analog in preparation for
the tissue impression.

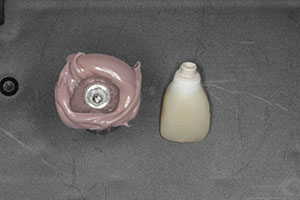
Figure 11. Provisional and analog were Figure 12. The provisional restoration was
inserted into the impression material. removed, yielding an exact replica of the
tissue contours.
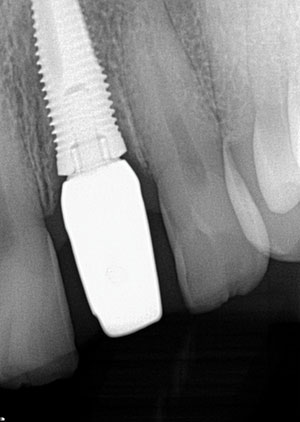
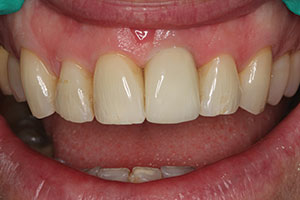
Figure 13. Radiograph showing the complete Figure 14. Final lithium disilicate
seating of a zirconia platform-switching restoration (IPS e.max [Ivoclar Vivadent]).
abutment. Note: It was made slightly lighter than the
surrounding teeth, per patient request.
Once the final restoration was received from the laboratory, the abutment was seated onto the implant. To achieve the best possible aesthetics, a custom zirconia abutment was fabricated. No anesthetic was used for placement since tissue displacement should only cause minimal discomfort. A radiograph was taken to confirm full seating of the abutment (Figure 13). A lithium disilicate crown (IPS e.max [Ivoclar Vivadent]) was checked for fit and occlusion. Then, using try-in paste (RelyX Try-In Paste [3M]), the aesthetics of the restoration was evaluated. (Note: The patient had requested that the color of the restoration be slightly lighter than his own teeth because he was supposed to have used whitening gel prior to the appointment, but had not done so.)
With the patient’s final approval of the restoration, the abutment was then tightened to the required manufacturer’s torque of 32 Ncm. The same bonding protocol was followed on the zirconia abutment and on the e.max crown. A cleansing agent (Ivoclean [Ivoclar Vivadent]) was first placed on the internal surfaces of the crown after try-in, then rinsed and dried, as directed. Then a silane ceramic primer (Clearfil Ceramic Primer [Kuraray Dental]) was applied, then dried after one minute, as directed. Finally, the adhesive (Scotchbond Universal Adhesive [3M]) was applied, air-dried, and left uncured. A thin layer of light-cure-only resin cement (RelyX Veneer cement [3M]) was applied to the internal surfaces of the crown and the restoration was seated. The restoration was tack-cured into place using a 2.0 mm light-curing tip for 10 seconds (Demi Plus [Kerr]). The excess cement was removed prior to final curing. Final light-curing was done and then the occlusion was checked and adjusted, as needed (Figure 14).
CLOSING COMMENTS
A variety of challenges must be overcome when placing an anterior implant. This article demonstrates a simplified and accurate technique protocol for predictable tissue contouring and impression taking for the anterior implant restoration.
References
- Fuentealba R, Jofré J. Esthetic failure in implant dentistry. Dent Clin North Am. 2015;59:227-246.
- Martin WC, Pollini A, Morton D. The influence of restorative procedures on esthetic outcomes in implant dentistry: a systematic review. Int J Oral Maxillofac Implants. 2014;29(suppl):142-154.
- LeSage BP. Improving implant aesthetics: prosthetically generated papilla through tissue modeling with composite. Pract Proced Aesthet Dent. 2006;18:257-263.
- De Rouck T, Collys K, Wyn I, et al. Instant provisionalization of immediate single-tooth implants is essential to optimize esthetic treatment outcome. Clin Oral Implants Res. 2009;20:566-570.
- Rodríguez X, Vela X, Calvo-Guirado JL, et al. Effect of platform switching on collagen fiber orientation and bone resorption around dental implants: a preliminary histologic animal study. Int J Oral Maxillofac Implants. 2012;27:1116-1122.
- Rompen E, Raepsaet N, Domken O, et al. Soft tissue stability at the facial aspect of gingivally converging abutments in the esthetic zone: a pilot clinical study. J Prosthet Dent. 2007;97(suppl 6):S119-S125.
- Hinds KF. Custom impression coping for an exact registration of the healed tissue in the esthetic implant restoration. Int J Periodontics Restorative Dent. 1997;17:584-591.
- Schoenbaum TR, Chang YY, Klokkevold PR, et al. Abutment emergence modification for immediate implant provisional restorations. J Esthet Restor Dent. 2013;25:103-107.
- Azer SS. A simplified technique for creating a customized gingival emergence profile for implant-supported crowns. J Prosthodont. 2010;19:497-501.
- Becker W, Doerr J, Becker BE. A novel method for creating an optimal emergence profile adjacent to dental implants. J Esthet Restor Dent. 2012;24:395-400.
- Chu SJ, Tarnow DP, Tan JH, et al. Papilla proportions in the maxillary anterior dentition. Int J Periodontics Restorative Dent. 2009;29:385-393.
- Rutkunas V, Sveikata K, Savickas R. Effects of implant angulation, material selection, and impression technique on impression accuracy: a preliminary laboratory study. Int J Prosthodont. 2012;25:512-515.
- Alshiddi IF, Dent DC. Accurate registration of peri-implant soft tissues to create an optimal emergence profile. Contemp Clin Dent. 2015;6(suppl 1):S122-S125.
Dr. Javaheri graduated from Tufts University School of Dental Medicine and currently maintains a private practice limited to appearance-related dentistry in Alamo, Calif. He has completed a 2-year advanced education in dentistry program at the University of the Pacific, San Francisco, where he is an assistant professor and course director for the postgraduate program “Setting New Standards in Cosmetic Dentistry.” He serves as a consultant to dental manufacturers and research organizations. He can be reached at drj@drjavaheri.com.
Disclosure: Dr. Javaheri reports no disclosures.